Set Up Your AirTag Using Your iPhone Or iPad
With an AirTag, you can keep track of items you use every day, such as your keys, bike, or a backpack. Lean how to set up your AirTag with your iPhone and replace the battery when its low on power.
To set up your AirTag you’ll need an iPhone or iPad with iOS 15.5 or later with Find My and Bluetooth turned on. You’ll also need a Wi-Fi or cellular connection and may need to turn on Location services and Precise Location located in Settings > Privacy > Location Services.
Set Up Your AirTag
Make sure that your device is ready for setup. If your AirTag is brand new, remove the wrap around the device and pull out the battery tab to activate the battery. Your AirTag will begin to play a sound.
Hold your AirTag near your iPhone, then tap Connect. If you have multiple AirTags and see “More than one AirTag detected”, make sure that you only have one AirTag near your device. Select an item name from the list or select Custom Name to name your AirTag and choose an emoji. Once done, tap Continue to register your AirTag.
To register your AirTag with your Apple ID, tap Continue until done. Once registered with your Apple ID you can attach your AirTag to your item and see it in the Find My app.
Change The Name Of Your AirTag
- To change the name of your AirTag, open the Find My app, then tap the Items tab.
- Tap the AirTag whose name or emoji you want to change.
- Scroll down and tap Rename Item.
- Select a name from the list or select Custom Name.
- Type a custom name for your AirTag and select an emoji.
- Tap Done.

If You Can’t Set Up Your AirTag
If your AirTag won’t connect or you can’t set it up try the following steps.
- Make sure that your device is ready for setup.
- If the setup animation has disappeared, press the side button or Sleep/Wake button on your iPhone to put your device to sleep. Then wake and unlock your iPhone. Wait up to 15 seconds, and the animation should reappear.
- If the setup animation still doesn’t show up, open the Find My app and tap the Items tab.
- If you have multiple AirTags to set up, make sure that only one is near your device each time.
- Remove and then replace the battery in your AirTag.
- If your AirTag still won’t connect to your device, reset your AirTag by removing then replacing the battery
Find Out If You Need to Replace The Battery
You’ll know when your AirTag battery is very low as a notification will appear on your iPhone and in the Find My app. AirTags are designed to keep going for more than a year before needing to be replaced.
You can also check if the battery needs to be replaced in the Find My app:
- Open the Find My app on your iPhone or iPad.
- Tap the Items tab.
- Tap the AirTag whose battery charge you want to check.
- If the battery level is very low, Low Battery will appear under the name of your AirTag.
Warning: AirTag, the battery cover and the battery may present a choking hazard or cause other injury to small children. Keep these items away from small children.

Replace The Battery In Your AirTag
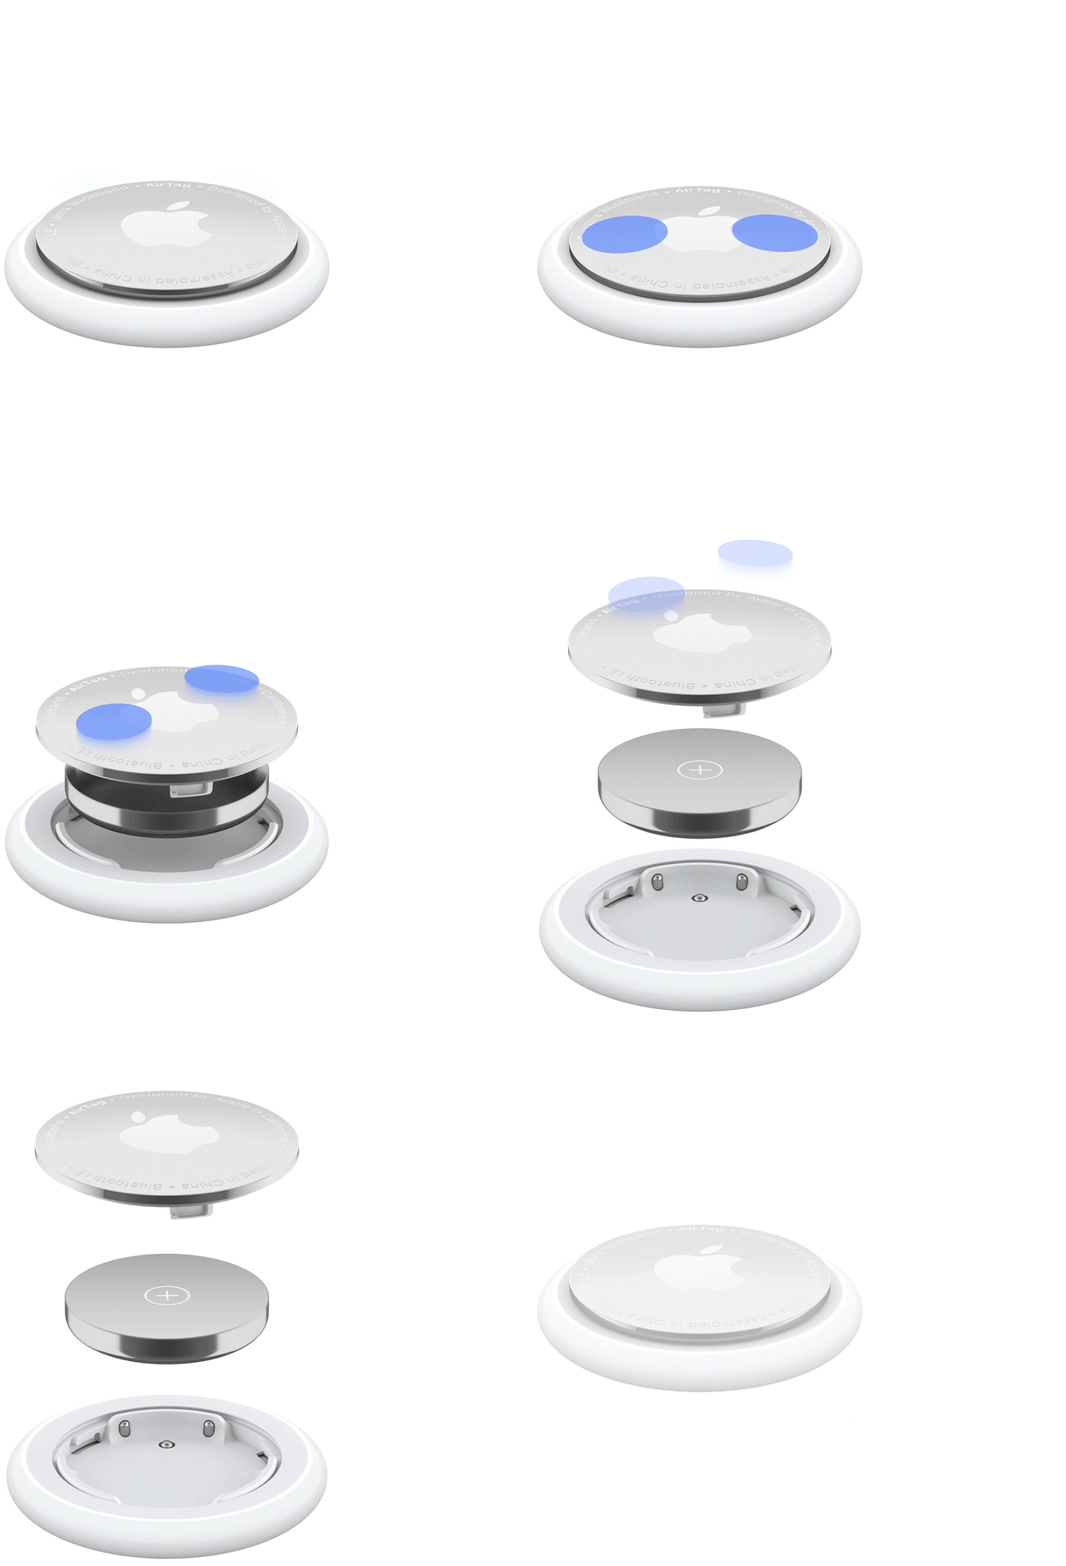
The battery in your AirTag is a CR2032 lithium 2V coin battery that’s removable. These are available at most electronic stores and pharmacies when you need a replacement. Here’s how to replace it.
- Press down on the polished stainless steel battery cover of your AirTag and rotate anticlockwise until the cover stops rotating.
- Remove the cover and battery.
- Insert a new CR2032 lithium 3V coin battery with the positive side facing up. You’ll hear a sound indicating that the battery is connected.
- Replace the cover, making sure that the three tabs on the cover align with the three slots on the AirTag.
- Rotate the cover clockwise until it stops.

